How to implement SSO#
First, set up an SSO application in your Identity Provider by following the relevant instructions below:
With Azure Active Directory#
Follow the steps in the Microsoft tutorial Azure AD SSO integration with Snowflake.
With Google#
Follow the steps in the Snowflake knowledge base article Configure Google Workspace as an Identity Provider for SSO with Snowflake.
With AWS Cognito#
Follow the steps in the Snowflake knowledge base article AWS Cognito as Custom OAuth Provider with Snowflake.
With Okta#
Follow the steps in the Okta documentation article How to Configure SAML 2.0 for Snowflake Computing.
With Other Identity Providers#
Other SAML-based SSO integrations may be possible by running the relevant Snowflake SQL command with the saml2_issuer, saml2_sso_url, saml2_snowflake_acs_url, saml2_snowflake_issuer_url, and saml2_x509_cert as required for your IdP's SAML configuration.
After completing the security integration steps, users should be able to log into Snowflake via your IdP.
SSO Users must be created in Snowflake
A Snowflake user with the same username and/or email address must already exist in your Snowflake account (and have the correct roles and other settings set up) in order to be able to access Snowflake. Simply authorizing users to access Snowflake in your IdP alone will not work.
Connecting to SSO-enabled Snowflake with Snowflake web interface#
If a valid SSO security integration is active on your Snowflake account, users should see a button on the login screen of the Snowflake web interface which reads "Sign in using Custom Single Sign On" (or similar). Clicking the button will redirect to your IdP's login system, and a successful login will redirect back to the Snowflake web interface.
Connecting to SSO-enabled Snowflake with DBeaver#
Users connecting to Snowflake with DBeaver should see a dropdown in the Authentication section when adding the Snowflake connection – this should be changed from the default Database native to SSO (Browser). With this configuration, users attempting to connect to Snowflake in DBeaver will have their web browser open to their IdP's login page, and only after successful login will DBeaver be able to access the Snowflake database.
DBeaver SSO tip
We have found that sometimes DBeaver will prompt for SSO authentication multiple times. This likely has to do with the fact that DBeaver makes several simultaneous connections to a datasource (a control channel and a data channel) and requires separate authentication for each. This is a slight inconvenience, but simply completing the SSO authentication process several times should allow users to proceed to access the data using DBeaver.
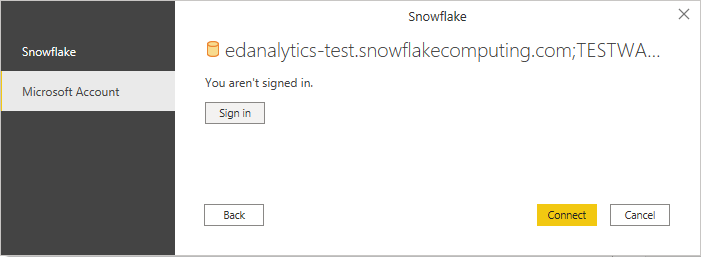
Connecting to SSO-enabled Snowflake with Power BI#
When connecting to Snowflake with Power BI, users will be prompted for the username and password to use to connect. Rather than supplying these, instead choose the Microsoft Account tab to sign in with Azure AD SSO. (Other SSO providers are not supported by Power BI at this time.)